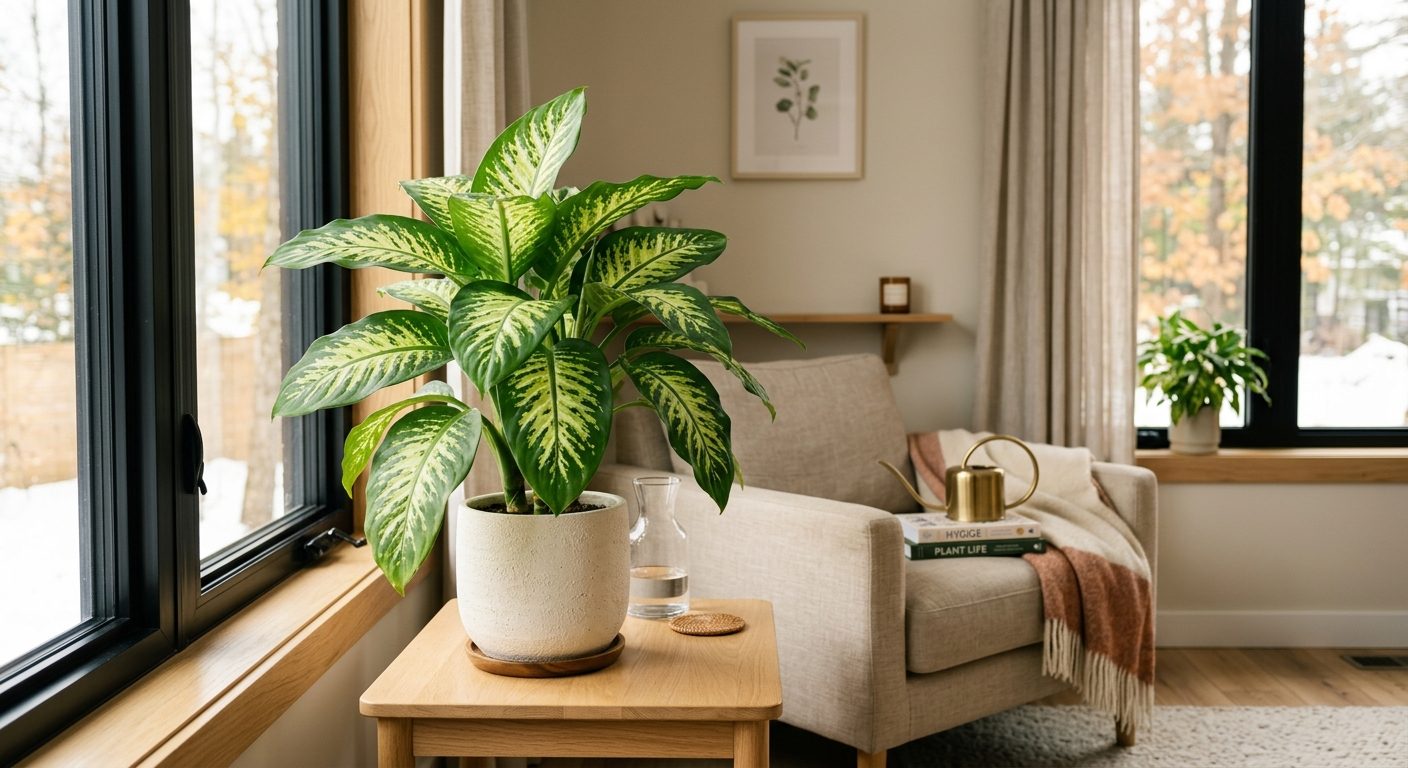
Why Dieffenbachia Remains a Staple Foliage Plant in Canadian Homes
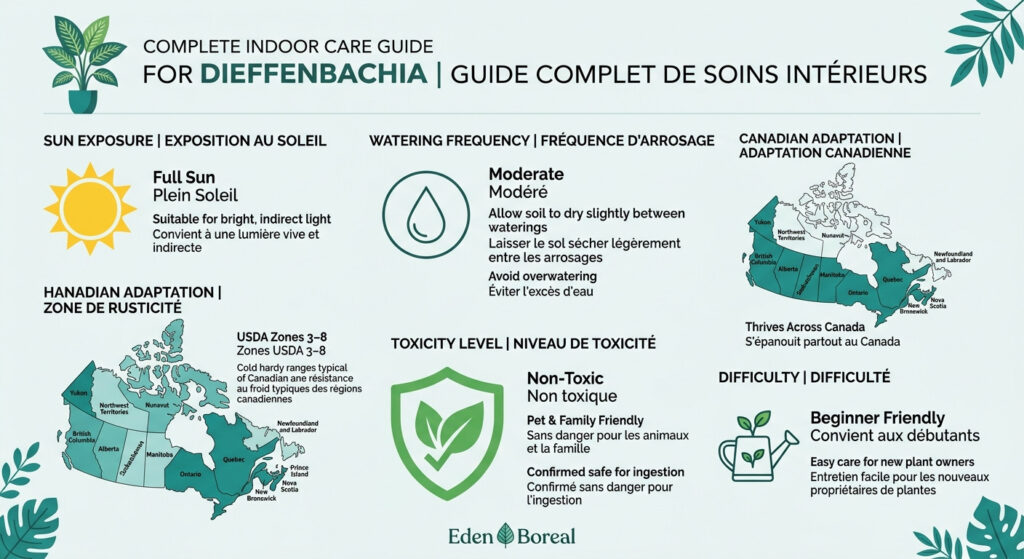
Native to the tropical forests of Central and South America, Dieffenbachia has earned its place as one of the most popular foliage houseplants in Canada, particularly in urban apartments across Quebec, Ontario, and British Columbia. Known colloquially as dumb cane due to the temporary speech impairment caused by ingesting its sap, this member of the Araceae family combines striking variegated leaves with remarkable adaptability to low-light indoor environments. In zones 3-9, where outdoor cultivation is impossible, Dieffenbachia flourishes indoors year-round, tolerating the dry air of Canadian winters better than many tropical competitors. Its ability to maintain visual interest without flowering makes it ideal for north-facing windows in Toronto condos or dimly lit Montreal basements, provided growers understand its physiological quirks: a shallow root system demanding precise watering intervals, light thresholds below which variegation fades, and calcium oxalate crystals that pose genuine toxicity risks to households with pets or children.
| Characteristic | Value |
|---|---|
| Botanical name | Dieffenbachia seguine |
| Plant type | Tropical evergreen perennial |
| Mature size | 60-120 cm height, 30-60 cm spread |
| Light | Bright indirect light, 200-400 foot-candles |
| Watering | Every 5-7 days when top 3 cm of substrate dry |
| Ideal temperature | 18-24°C |
| Humidity | 50-60% |
| Hardiness zones (outdoors) | Zone 10-11 (indoor only in Canada) |
| Toxicity | Yes, toxic to cats, dogs, and humans |
| Difficulty level | Beginner |
What Makes Dieffenbachia Different from Other Popular Foliage Houseplants

Unlike Pothos or Philodendron, which rely on aerial roots for nutrient absorption and can tolerate erratic watering, Dieffenbachia develops a compact, shallow root system concentrated in the top 10-15 cm of substrate. This morphology evolved in the forest understory where nutrient-rich leaf litter accumulates at the surface, but it creates specific vulnerabilities in container culture: roots dry out rapidly when substrate moisture drops below 40%, yet waterlogging above 80% saturation triggers root rot within 48-72 hours. The plant’s thick, succulent stems store water and carbohydrates, allowing it to survive brief droughts that would kill a Calathea, but this same tissue becomes a vector for calcium oxalate crystal formation throughout all above-ground parts. In practical terms, a mature Dieffenbachia in a 25 cm pot in a Vancouver apartment (zone 8b) will consume approximately 250-300 mL of water every 5-6 days during summer, compared to 400-500 mL for a similarly sized Monstera with its extensive aerial root network.
Comparative Root Morphology and Container Implications
Dieffenbachia roots lack the adventitious root initiation seen in climbing aroids, meaning the plant cannot regenerate root mass from stem nodes as readily as Pothos. When repotting specimens in Ottawa (zone 5a) during spring, growers often find a dense mat of fine roots occupying only the bottom third of the pot, with minimal penetration into deeper substrate layers. This concentration demands pots no deeper than 20-25 cm for mature plants; deeper containers retain excess moisture in the lower zone, creating anaerobic conditions that favour Pythium and Phytophthora pathogens. A 60 cm tall Dieffenbachia thrives in a 20 cm diameter × 18 cm depth pot, whereas a 60 cm Philodendron would require 25 cm depth to accommodate its descending root architecture.
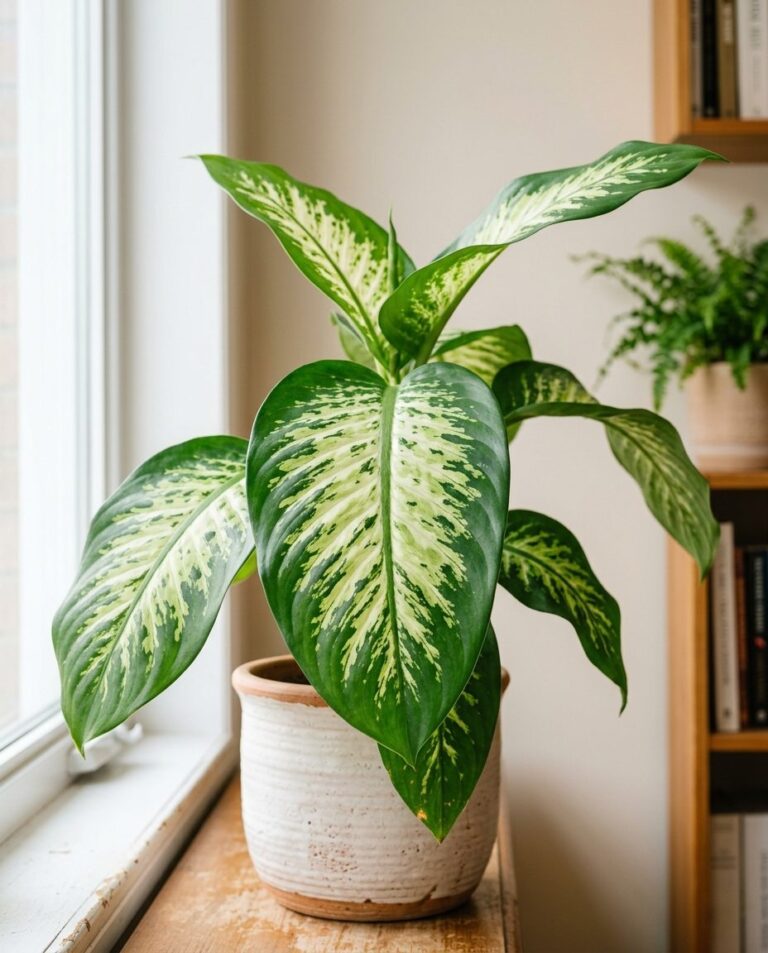
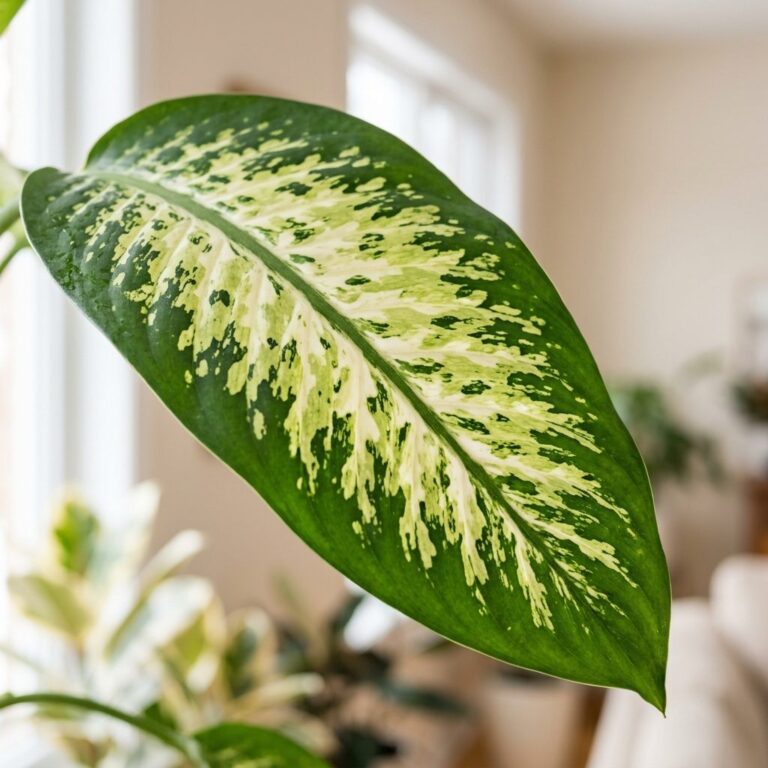
Leaf Anatomy and Variegation Stability
The large, ovate leaves of Dieffenbachia contain specialized idioblast cells that produce needle-shaped calcium oxalate crystals (raphides) as a herbivore deterrent. These crystals measure 50-200 micrometers in length and penetrate mucous membranes on contact, causing immediate pain and swelling. Variegated cultivars like Dieffenbachia ‘Tropic Snow’ and ‘Camille’ maintain their white or cream sectors through chlorophyll-deficient tissue that relies on adjacent green cells for photosynthate supply. Under insufficient light (<150 foot-candles), new leaves revert to solid green as the plant prioritizes survival over ornamental patterning, a physiological response absent in genetically stable variegates like Pothos 'Marble Queen'. In Edmonton (zone 4a), where winter daylight drops to 7.5 hours, supplemental LED grow lights providing 200-300 foot-candles for 10-12 hours daily preserve variegation through December-February.
Light Requirements and the Variegation Loss Threshold in Dieffenbachia
Quantified light measurements reveal that Dieffenbachia maintains optimal growth and variegation between 200-400 foot-candles (2,150-4,300 lux), a range achievable 1-2 meters from an unobstructed east-facing window in Toronto or 0.5-1 meter from a west-facing window with sheer curtains in Calgary (zone 4a). Below 150 foot-candles, chlorophyll production increases in variegated sectors to compensate for reduced photosynthetic capacity, causing new leaves to emerge progressively greener over 6-8 weeks. Above 500 foot-candles, direct sun exposure causes chloroplast damage visible as bleached patches or brown necrotic spots within 3-5 days, particularly on white or cream leaf areas lacking protective pigments. A light meter (available at Canadian Tire or Lee Valley Tools for $25-40) provides objective readings; alternatively, the shadow test offers approximation: a sharp, well-defined hand shadow indicates 400+ foot-candles (too bright), a soft but visible shadow suggests 200-300 foot-candles (ideal), and no discernible shadow signals <150 foot-candles (insufficient).
Seasonal Light Adjustments in Canadian Zones
In Winnipeg (zone 3a), where the solar altitude drops to 18° at winter solstice, a south-facing window that delivers 600 foot-candles in June provides only 120-150 foot-candles in December. Growers must relocate Dieffenbachia specimens closer to windows or introduce supplemental lighting to maintain the 200 foot-candle minimum. Full-spectrum LED panels (5,000-6,500 K colour temperature) positioned 30-40 cm above foliage for 10-12 hours daily prevent variegation loss and internode stretching. Conversely, in Vancouver (zone 8b), where summer daylight extends to 16 hours, plants positioned for optimal winter light may require sheer curtains or relocation away from windows during May-August to avoid exceeding the 500 foot-candle upper threshold.
Variety-Specific Light Tolerance Ranking
- Dieffenbachia ‘Camille’: Highest light demand (250-400 foot-candles) due to extensive cream-white central variegation; tolerates brief exposure to 500 foot-candles without damage
- Dieffenbachia ‘Tropic Snow’: Moderate demand (200-350 foot-candles); white flecking pattern maintains stability at lower intensities than ‘Camille’
- Dieffenbachia seguine (species form): Lowest demand (150-300 foot-candles); solid green leaves maximize photosynthetic efficiency in dim conditions
- Dieffenbachia ‘Reflector’: Moderate-high demand (225-375 foot-candles); silvery-green variegation requires consistent light to prevent reversion
Watering Frequency Based on Dieffenbachia’s Shallow Root System
The shallow root system of Dieffenbachia dictates a watering interval of 5-7 days during active growth (April-September in southern Ontario, May-August in Alberta), extending to 10-14 days during winter dormancy when metabolic activity slows. The diagnostic criterion is substrate moisture at 3 cm depth: insert a finger or wooden skewer to this depth, and water only when the substrate feels dry to the touch and the skewer emerges clean without adhering particles. This shallow monitoring depth corresponds to the root zone concentration; deeper substrate layers remain moist longer but are irrelevant to root function. A mature plant in a 20 cm pot typically requires 250-300 mL per watering event, applied slowly over 2-3 minutes to allow even substrate saturation without runoff. In Calgary’s low-humidity environment (winter indoor RH often 20-30%), evapotranspiration accelerates, shortening intervals to 4-5 days, whereas in coastal Halifax (zone 6a) with 50-60% RH, 7-9 day intervals suffice.
Overwatering Symptoms and Root Rot Progression
Overwatering manifests within 7-10 days as lower leaf yellowing that begins at the petiole and spreads outward, accompanied by a musty odor from the substrate surface. Unlike nutrient deficiency yellowing (which affects older leaves uniformly), overwatering yellowing shows a waterlogged, translucent quality before turning fully yellow. If substrate remains saturated beyond 72 hours, Pythium root rot colonizes fine roots, causing them to turn brown, mushy, and detach easily when tugged. At this stage, salvage requires immediate repotting: remove the plant, rinse roots under lukewarm water, excise all brown/soft tissue with sterilized pruners, dust cut surfaces with cinnamon powder (natural antifungal), and replant in fresh, dry substrate. Withhold water for 5-7 days to allow wound healing, then resume a conservative schedule. In Montreal (zone 5b), where winter heating systems create 25-35% RH, growers often overcompensate by overwatering; a pebble tray with water beneath (but not touching) the pot base provides localized humidity without saturating roots.
Seasonal Watering Adjustments for Canadian Climates
During October-March in Saskatoon (zone 3b), when indoor temperatures drop to 18-20°C and light intensity decreases by 40-50%, Dieffenbachia enters semi-dormancy with minimal new growth. Reduce watering frequency by 30-40%, extending intervals to 10-14 days, and decrease volume to 150-200 mL per event. The substrate should approach 50% dryness (measured with a moisture meter at 5 cm depth) before rewatering, compared to 30-40% dryness during summer. Conversely, in air-conditioned Vancouver apartments during July-August, where temperatures remain stable at 22-24°C year-round, maintain consistent 5-7 day intervals but monitor for accelerated drying if AC reduces humidity below 45%. A simple hygrometer ($10-15 at Canadian Tire) placed near the plant provides actionable data: below 40% RH, consider grouping plants to create a localized humid microclimate or using a small humidifier.
Soil Composition and Drainage Critical for Preventing Root Rot
A substrate formulated for Dieffenbachia must balance moisture retention in the top 5 cm (where roots concentrate) with rapid drainage below to prevent waterlogging. The optimal recipe combines 50% peat-based potting mix (or coco coir as a sustainable alternative), 30% perlite (grade 3, 3-6 mm particle size), 15% pine bark fines (2-5 mm), and 5% horticultural charcoal. This blend achieves 60-70% water retention capacity in the root zone while allowing excess to drain within 5-10 seconds. Generic “all-purpose” mixes sold at Home Depot or Rona often contain 70-80% peat with minimal aeration amendments, retaining moisture too long for Dieffenbachia’s shallow roots. In Toronto, Pro-Mix BX (available at most garden centers) provides a suitable base; amend it with one part perlite to three parts Pro-Mix to increase porosity. In Vancouver, where coastal humidity is high, increase perlite to 35-40% to compensate for slower evaporation rates.
Container Selection and Drainage Infrastructure
Pots must feature multiple drainage holes (minimum 3-4 holes of 1 cm diameter for a 20 cm pot) and a depth-to-diameter ratio of 0.8-1.0 (e.g., 20 cm diameter × 18 cm depth). Avoid decorative cache-pots without drainage unless using a removable nursery pot insert; standing water in an outer vessel creates a humidity trap that suffocates roots. In Edmonton, where winter indoor air is exceptionally dry, terracotta pots accelerate substrate drying through evaporation via porous walls, necessitating more frequent watering (every 4-5 days) compared to plastic or glazed ceramic pots (every 6-7 days). For growers struggling with watering discipline, self-watering pots with a reservoir and capillary wick (e.g., Lechuza brand, available at Lee Valley) maintain consistent moisture in the top substrate layer while preventing saturation, though they require recalibration of watering volume and frequency.
Repotting Protocol and Timing
Repot Dieffenbachia every 18-24 months in spring (late April-May in zone 5, early May-June in zone 3) when roots circle the pot perimeter or emerge from drainage holes. Select a pot 3-5 cm larger in diameter than the current container; oversized pots (>5 cm increase) hold excess substrate that remains wet and unused by roots, promoting fungal growth. The repotting process: water the plant 24 hours prior to reduce transplant shock, gently remove from the old pot, tease apart outer roots if densely matted, trim any brown or damaged roots with sterilized pruners, place 2-3 cm of fresh substrate in the new pot, center the plant at the same depth as previously (never bury the stem deeper), fill around the root ball with substrate, firm gently, and water lightly (100-150 mL) to settle. Withhold fertilizer for 4 weeks post-repotting, as fresh substrate contains sufficient nutrients and roots need time to establish before processing additional inputs.
Understanding Dieffenbachia’s Toxicity: Calcium Oxalate Crystals and Safe Handling
All parts of Dieffenbachia contain calcium oxalate crystals in the form of needle-shaped raphides bundled within specialized idioblast cells. When plant tissue is chewed or crushed, these cells rupture, releasing thousands of microscopic needles that penetrate oral and esophageal mucosa, causing immediate intense pain, swelling, and salivation. The common name “dumb cane” derives from the temporary inability to speak due to tongue and throat swelling following ingestion. In pets, symptoms appear within 5-15 minutes: excessive drooling, pawing at the mouth, difficulty swallowing, and vomiting. In severe cases (ingestion of large quantities), airway swelling can impair breathing, requiring emergency veterinary intervention. The crystals also contain proteolytic enzymes that exacerbate tissue damage. Human skin contact with sap rarely causes more than mild irritation, but eye contact (e.g., rubbing eyes after handling cut stems) can cause corneal abrasion and intense pain lasting several hours.
Practical Safety Protocols for Canadian Households
- Placement strategy: Elevate plants on tall stands (>1.5 m) or wall-mounted shelves inaccessible to cats and dogs; avoid floor placement in homes with curious pets
- Handling precautions: Wear nitrile gloves when pruning or propagating; wash hands thoroughly with soap after any contact; never touch face or eyes during handling
- Pruning debris disposal: Seal cut leaves and stems in a plastic bag before discarding in household waste; do not compost, as crystals remain active for months
- Child education: Teach children (age 3+) that Dieffenbachia is a “look but don’t touch” plant; consider alternative non-toxic houseplants (e.g., Spider Plant, Boston Fern) in homes with toddlers
- Emergency response: If ingestion occurs, rinse mouth with cool water, offer ice chips or popsicles to reduce swelling, and contact a poison control center (1-800-268-9017 in Ontario, 1-800-463-5060 in Quebec) or veterinarian immediately
Myth Correction: Dermal Toxicity and Airborne Risk
Contrary to some online claims, Dieffenbachia does not release toxins into the air or cause harm through proximity. The calcium oxalate crystals are mechanically active only upon direct tissue contact; simply being in the same room poses zero risk. Intact leaves and stems contain the crystals within cell walls; toxicity requires physical disruption (biting, cutting, crushing). Dermal contact with intact foliage is safe for most individuals, though those with sensitive skin may experience mild irritation from prolonged handling. The plant’s reputation for danger is disproportionate to actual risk when basic precautions are observed. In Ottawa, where Dieffenbachia is common in office buildings and condos, documented cases of serious poisoning are exceedingly rare, typically involving pets or young children with unsupervised access.
Identifying and Treating Spider Mites, Brown Leaf Tips, and Yellowing in Dieffenbachia
Spider mites (Tetranychus urticae) are the most common pest afflicting Dieffenbachia in Canadian homes, particularly during winter when indoor humidity drops below 40% and heating systems create ideal conditions for mite reproduction. Early detection is critical: inspect the undersides of leaves weekly with a magnifying glass for tiny (0.5 mm) oval-shaped mites, pale yellow or red in colour, often accompanied by fine webbing between leaf veins. Initial damage appears as stippling (tiny yellow or white dots) on upper leaf surfaces where mites puncture cells to feed on chlorophyll. Left untreated, infestations escalate within 2-3 weeks, causing leaves to turn bronze, dry out, and drop prematurely. Unlike fungal or bacterial issues, spider mite damage shows a distinctive speckled pattern rather than uniform yellowing or brown patches.
Non-Chemical Spider Mite Control Protocol
- Isolation: Immediately separate the infested plant from other houseplants to prevent spread; spider mites disperse via air currents and can colonize nearby plants within 48-72 hours
- Water spray: Carry the plant to a bathtub or outdoor area (if temperature >15°C), and forcefully spray all leaf surfaces, especially undersides, with lukewarm water (20-22°C) to dislodge mites and webs; repeat every 3 days for 2 weeks
- Neem oil application: Mix 15 mL cold-pressed neem oil (available at most Canadian garden centers, e.g., Safer’s brand) with 5 mL liquid castile soap and 1 L water in a spray bottle; shake vigorously and spray all foliage until dripping, ensuring coverage of undersides; apply in the evening to avoid leaf burn, and repeat every 5-7 days for 3-4 applications
- Humidity increase: Raise ambient humidity to 50-60% using a humidifier or pebble tray; spider mites reproduce poorly above 50% RH, and populations decline naturally within 2-3 weeks under sustained higher humidity
- Monitoring: After treatment, inspect weekly for 6 weeks; mite eggs hatch in 3-5 days, so vigilance prevents resurgence
Brown Leaf Tips: Diagnosis and Correction
Brown, crispy leaf tips on Dieffenbachia indicate low humidity (<30% RH), fluoride toxicity from tap water, or salt accumulation from over-fertilization. In Winnipeg (zone 3a), where winter indoor RH often drops to 15-25%, tip browning affects 60-70% of houseplants; the solution is a cool-mist humidifier placed within 1-2 meters of the plant, maintaining 45-55% RH. If humidity is adequate but tips still brown, suspect fluoride in municipal water: many Canadian cities (e.g., Calgary, Edmonton) fluoridate tap water to 0.7-1.0 ppm, a level harmless to humans but toxic to sensitive plants over months of accumulation. Switch to filtered water (carbon filter removes fluoride) or collect rainwater during spring-fall. Salt accumulation from synthetic fertilizers manifests as white crust on the substrate surface and pot rim; flush the pot with 2-3 volumes of lukewarm water every 3 months to leach excess salts, or repot into fresh substrate if crusting is severe.
Yellowing Leaves: Differential Diagnosis
- Lower leaf yellowing (1-2 oldest leaves): Normal senescence as the plant sheds mature foliage; no action needed unless rate exceeds 1 leaf per month
- Widespread yellowing with soft, mushy stems: Overwatering and root rot; see “Watering Frequency” section for salvage protocol
- Yellowing with dry, crispy edges: Underwatering; increase frequency and volume, ensuring substrate reaches 60-70% moisture at 3 cm depth
- Yellowing of new growth only: Nitrogen deficiency; apply balanced liquid fertilizer (10-10-10 or 20-20-20) at half strength every 3-4 weeks during April-September
- Yellowing with loss of variegation: Insufficient light; relocate to brighter location or add supplemental LED lighting (see “Light Requirements” section)
Propagating Dieffenbachia from Stem Cuttings: Timing and Success Rates
Stem cutting propagation is the most reliable method for multiplying Dieffenbachia, with success rates of 80-90% when executed during the active growth phase (May-July in southern Canada, June-August in northern zones). Unlike many aroids that root readily from single nodes, Dieffenbachia requires cuttings with at least two nodes and one intact leaf to provide sufficient carbohydrate reserves for root initiation. The optimal cutting measures 10-15 cm in length, taken from healthy, disease-free stems using sterilized pruning shears (wipe blades with 70% isopropyl alcohol between cuts). Timing matters: cuttings taken during spring-summer root in 14-21 days, whereas fall-winter cuttings (October-February in Ontario) require 4-6 weeks due to slower metabolic activity and lower ambient temperatures.
Step-by-Step Propagation Protocol
- Cutting preparation: Select a stem section with 2-3 nodes and 1-2 leaves; make a clean cut 0.5 cm below the lowest node at a 45° angle to maximize rooting surface area; remove the lowest leaf to expose the node for root emergence
- Rooting medium: Fill a 10 cm pot with a 50/50 mix of perlite and peat moss (or coco coir); moisten until water drains freely but substrate is not saturated
- Hormone application (optional but increases success to 90%+): Dip the cut end in rooting hormone powder (0.1-0.3% IBA, available at Canadian Tire or Lee Valley); tap off excess
- Insertion: Insert the cutting 3-4 cm deep, burying at least one node; firm substrate gently around the stem
- Environment: Place in bright indirect light (200-300 foot-candles); maintain 22-25°C ambient temperature and 60-70% humidity by enclosing the pot in a clear plastic bag (remove daily for 10 minutes to prevent fungal growth)
- Watering: Mist substrate surface every 2-3 days to maintain consistent moisture without waterlogging; roots emerge from nodes in 14-21 days
- Transplanting: Once roots reach 3-5 cm length (visible through drainage holes or by gently tugging the cutting to feel resistance), transplant into a 12 cm pot with standard Dieffenbachia substrate; acclimate to normal care over 1 week
Water Propagation Alternative and Limitations
Dieffenbachia cuttings root successfully in water, making this method popular for its visibility and simplicity. Place the cutting in a glass jar with 5-8 cm of room-temperature water, ensuring nodes are submerged but leaves remain above water. Change water every 3-4 days to prevent bacterial growth. Roots appear in 10-14 days, faster than soil propagation due to constant moisture availability. However, water-grown roots are fragile and adapted to an aquatic environment; transplanting to substrate causes 30-40% transplant shock mortality as roots struggle to adapt to air pockets and variable moisture. To minimize shock, transition gradually: once water roots reach 4-6 cm, plant in very moist substrate (70-80% saturation) and maintain high humidity (60-70%) for 2 weeks, gradually reducing moisture to normal levels. Despite this challenge, water propagation remains viable for growers in Vancouver or Halifax who can maintain stable indoor humidity year-round.
Dieffenbachia Varieties by Leaf Pattern and Growth Habit
The genus Dieffenbachia comprises approximately 50 species, but only 5-6 cultivars dominate Canadian retail availability. Each variety exhibits distinct leaf patterns, growth habits, and light tolerance, allowing growers to select specimens suited to specific indoor conditions. Dieffenbachia ‘Camille’, introduced to North American horticulture in the 1980s, features bold cream-white central variegation bordered by dark green margins, reaching 60-90 cm height with a compact, upright habit ideal for tabletops or desks in Toronto or Montreal offices. Its high variegation ratio demands brighter light (250-400 foot-candles) than species forms. Dieffenbachia ‘Tropic Snow’, by contrast, displays fine white flecking and streaking across dark green leaves, creating a frosted appearance; it tolerates slightly lower light (200-350 foot-candles) and grows to 80-120 cm, making it suitable for floor placement near east-facing windows in Edmonton or Saskatoon.
Comparative Variety Profiles
- Dieffenbachia seguine (species): Solid green leaves, 100-150 cm height, lowest light tolerance (150-300 foot-candles), fastest growth rate (20-30 cm per year), ideal for dim corners or north-facing rooms in Vancouver or Halifax
- Dieffenbachia ‘Camille’: Cream-white center with green margins, 60-90 cm height, high light demand (250-400 foot-candles), moderate growth (15-20 cm per year), best for bright offices or living rooms in Calgary or Ottawa
- Dieffenbachia ‘Tropic Snow’: White-flecked green leaves, 80-120 cm height, moderate light tolerance (200-350 foot-candles), moderate growth (18-25 cm per year), versatile for most Canadian indoor settings
- Dieffenbachia ‘Reflector’: Silvery-green variegation with darker veins, 70-100 cm height, moderate-high light demand (225-375 foot-candles), slow growth (10-15 cm per year), prized for unique colouration in Toronto or Montreal design-focused interiors
- Dieffenbachia ‘Compacta’: Dense, clustered foliage with cream-yellow variegation, 40-60 cm height, moderate light tolerance (200-350 foot-candles), compact habit ideal for small apartments in Quebec City or Winnipeg
Sourcing Varieties in Canada
Dieffenbachia ‘Camille’ and ‘Tropic Snow’ are widely available at major retailers (Home Depot, Lowe’s, Rona) and independent garden centers across Canada during spring-summer (March-July). Specialty varieties like ‘Reflector’ or ‘Compacta’ require sourcing from online retailers such as Plantsome.ca (ships across Canada), Folia Collective (Toronto), or The Bloomery (Vancouver). Prices range from $15-25 for 15 cm pot sizes of common varieties to $40-60 for 20 cm pots of rare cultivars. When purchasing, inspect for firm stems (soft or mushy indicates rot), vibrant variegation (faded patterns suggest light stress), and absence of pests (check undersides of leaves for spider mites or scale). Avoid specimens with yellowing leaves or brown tips, as these indicate pre-existing stress that may worsen post-purchase.
Temperature Sensitivity and Protection from Cold Drafts
Dieffenbachia evolved in tropical understory environments where temperatures fluctuate minimally between 20-28°C year-round. In Canadian homes, maintaining 18-24°C is critical; exposure to temperatures below 15°C for more than 2-3 hours triggers cold shock, visible as sudden leaf drooping, translucent water-soaked patches on foliage, and blackening of leaf margins within 24-48 hours. Prolonged exposure (<10°C for 6+ hours) causes irreversible cellular damage, killing the plant within a week. In Winnipeg or Edmonton, where winter outdoor temperatures plummet to -30°C or lower, cold drafts from poorly sealed windows, exterior doors, or uninsulated walls pose significant risk. Even a 5-minute exposure to a 10°C draft (e.g., when opening a door to retrieve mail) can damage leaves within the draft path. Symptoms of cold draft exposure include downward leaf curling, yellowing along veins, and eventual necrosis of affected tissue.
Cold Draft Prevention Strategies
- Placement: Position Dieffenbachia at least 1 meter away from exterior doors, windows (especially single-pane), and heating vents; avoid placement on windowsills in zones 3-5 during October-March
- Window insulation: Apply plastic window insulation film (available at Canadian Tire, Home Depot) to windows near plants; this creates an insulating air gap that reduces cold radiation and drafts by 30-40%
- Thermometer monitoring: Place a min/max thermometer near the plant to track overnight temperature lows; if readings drop below 16°C, relocate to a warmer area or add a space heater set to 18°C minimum
- Curtain barriers: Close heavy curtains or blinds at night to create a thermal barrier between plants and cold windows; this simple measure raises near-window temperatures by 2-4°C
- Heating vent management: While cold drafts are harmful, hot, dry air from forced-air heating vents is equally damaging, causing rapid desiccation and brown leaf tips; redirect vents away from plants or install vent deflectors
Recovery Protocol After Cold Damage
If Dieffenbachia exhibits cold shock symptoms, immediate intervention can salvage the plant. Move it to a stable 20-22°C environment away from drafts. Do not prune damaged leaves immediately; the plant may reabsorb nutrients from partially damaged tissue over 1-2 weeks. Reduce watering frequency by 30-40% (e.g., from every 6 days to every 8-9 days), as cold-stressed roots absorb water slowly and overwatering risks rot. Withhold fertilizer for 4-6 weeks to avoid stressing the plant further. After 2 weeks, assess damage: leaves with 50% damage should be pruned at the petiole base with sterilized shears. New growth typically resumes within 4-6 weeks if the stem and roots remain viable. In severe cases where the main stem has blackened, attempt propagation from any healthy stem sections following the protocol in the “Propagating Dieffenbachia” section.
Frequently Asked Questions About Dieffenbachia Care in Canada
Do Dieffenbachia like sun or shade, and what happens to the leaves in low light?
Dieffenbachia thrives in bright indirect light measuring 200-400 foot-candles, equivalent to a location 1-2 meters from an east-facing window in Toronto or 0.5-1 meter from a west-facing window with sheer curtains in Calgary. Direct sun causes bleached patches and brown necrotic spots within 3-5 days, while light below 150 foot-candles triggers variegation loss as new leaves emerge progressively greener over 6-8 weeks. In low light, internodes elongate (stretching between leaves increases from 5-8 cm to 12-15 cm), and growth slows by 50-60%. Supplemental LED grow lights providing 200-300 foot-candles for 10-12 hours daily prevent these issues during Canadian winters in Edmonton or Winnipeg.
Are Dieffenbachia hard to keep alive, and what is the most common cause of failure?
Dieffenbachia ranks as a beginner-friendly houseplant with an 80-85% survival rate among Canadian growers when basic requirements are met. The most common cause of failure is overwatering leading to root rot, accounting for 60-70% of plant deaths. Dieffenbachia’s shallow root system concentrates in the top 10-15 cm of substrate, drying rapidly but also vulnerable to saturation if watered before the top 3 cm feels dry. In Montreal or Ottawa, where winter heating creates 25-35% indoor humidity, growers often overcompensate by watering too frequently. The second most common issue is cold draft exposure in zones 3-5 during winter, causing sudden leaf collapse and stem blackening. Avoiding these two pitfalls ensures long-term success.
Is Dieffenbachia toxic to touch, and what precautions should I take with pets and children?
Dieffenbachia is not toxic to touch; intact leaves and stems are safe to handle, though sensitive individuals may experience mild skin irritation from prolonged contact. Toxicity occurs only when plant tissue is chewed, crushed, or cut, releasing calcium oxalate crystals that penetrate mucous membranes and cause intense pain, swelling, and drooling. In households with cats, dogs, or children under age 5, elevate plants on tall stands (>1.5 m) or wall-mounted shelves inaccessible to curious mouths. Wear nitrile gloves when pruning or propagating, and seal cut debris in plastic bags before disposal. If ingestion occurs, rinse the mouth with cool water, offer ice chips to reduce swelling, and contact a poison control center (1-800-268-9017 in Ontario, 1-800-463-5060 in Quebec) or veterinarian immediately.
How often should I water my Dieffenbachia, and how do I know if it is overwatered?
Water Dieffenbachia every 5-7 days during active growth (April-September in southern Ontario, May-August in Alberta) and every 10-14 days during winter dormancy (October-March). The diagnostic test is substrate moisture at 3 cm depth: insert a finger or wooden skewer, and water only when it feels dry and the skewer emerges clean. Overwatering manifests as lower leaf yellowing with a waterlogged, translucent appearance, musty substrate odor, and brown, mushy roots visible when the plant is removed from its pot. In Calgary’s low-humidity environment (winter RH 20-30%), intervals shorten to 4-5 days, whereas in coastal Halifax (zone 6a) with 50-60% RH, 7-9 day intervals suffice. A moisture meter inserted to 5 cm depth provides objective data: water when readings drop to 3-4 on a 1-10 scale.
Why are the leaves turning yellow and losing their variegation?
Yellowing with variegation loss indicates insufficient light below the 200 foot-candle threshold. Under low light (<150 foot-candles), Dieffenbachia increases chlorophyll production in variegated sectors to maximize photosynthesis, causing new leaves to emerge progressively greener over 6-8 weeks. Relocate the plant closer to an east or west-facing window in Toronto or add supplemental LED grow lights providing 200-300 foot-candles for 10-12 hours daily. If yellowing occurs without variegation loss, diagnose based on pattern: widespread yellowing with soft stems signals overwatering and root rot; yellowing of only the oldest 1-2 leaves is normal senescence; yellowing of new growth indicates nitrogen deficiency, corrected by applying balanced liquid fertilizer (10-10-10 or 20-20-20) at half strength every 3-4 weeks during April-September.
Can I propagate Dieffenbachia from a single leaf or only from stem cuttings?
Dieffenbachia cannot be propagated from a single leaf without an attached stem node; leaf-only cuttings lack meristematic tissue necessary for root and shoot initiation and will rot within 2-3 weeks in water or soil. Successful propagation requires stem cuttings with at least two nodes and one intact leaf, taken during active growth (May-July in southern Canada, June-August in northern zones). The cutting should measure 10-15 cm in length, cut 0.5 cm below the lowest node at a 45° angle. Root the cutting in a 50/50 perlite-peat mix at 22-25°C with 60-70% humidity; roots emerge in 14-21 days, and the success rate is 80-90%. Water propagation is faster (10-14 days) but results in 30-40% transplant shock mortality when transferring to substrate, making soil propagation more reliable for Canadian growers in Edmonton, Winnipeg, or Montreal.